
How To Disable Avast ( Full Guides )
How to Disable Avast Antivirus Temporarily
Antivirus software might be the reason why you cannot install the program successfully, such as drivers, video program and some other important applications. They might not recognize the software. So when you cannot install the software, you can try disabling the antivirus software temporarily. If you are using Avast Antivirus, you can follow these steps to disable it temporarily.
Step 1:
Click the small triangle on your Windows taskbar to open the notification area. Right-click the Avast Antivirus icon for a list of options related to the security suite.
Step 2:

Click Avast shields control. You can select the option depending on how long you wish to disable Avast Antivirus.
Step 3:

After selecting the option, you will be prompted to confirm the operation. Click Yes to make a confirmation.
Are You Know?
The Google email, calendar, and drive client that's almost perfect
Carnegie Mellon-led non profit received $250 million to create a new robotics institute
Japan space agency fails to launch mini rocket
How to Disable (Turn Off, Stop) Avast Antivirus 2017 Completely or Temporarily
Once in a while you’ll probably need to turn off your Avast Antivirus, or just pause some of its shields. Usually because you want to install some other party security software like firewall, or because Avast is blocking your favorite website or application.
OUR TIP : If you want to disable Avast because it’s blocking program or website you trust, we suggest to use the Avast Exceptions/White-list instead.
Here’s the quick step-by-step guide on how to turn off/disable Avast 2017 – completely or temporarily. Steps are applicable for all Avast antivirus products (Free Antivirus, Pro Antivirus, Internet Security, or Avast Premier).
Quick Summary
Read more detailed steps and other options including screenshots below
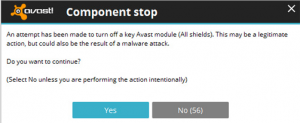
1. Turn Off/Disable Avast Completely (All Shields)
Turning off all Avast shields basically means completely turning off the whole Avast Antivirus active protection. So be sure you know what you’re doing, although it’s actually quite simple.
Step #1 – Just navigate to the Windows task bar and find the orange Avast icon. By default it is hidden in some Windows systems, so click on the top arrow if you don’t see it. Once you find the icon, perform a right-click on it, look for the option ‘Avast shields control‘, and select one of the options there – disable for a) 10 minutes; b) 1 hour; c) until computer restart; d) permanently.

Step #2 – Whatever option you will choose, Avast will ask you for a confirmation, which you have to confirm by selecting ‘Yes‘. And that’s it, Avast and all its shields should be disabled/paused for whatever time period you have selected.

Step #3 – If you want to make sure Avast is really disabled, just open its main window. It should be red and saying ‘You’re in danger‘. To re-enable it again, click on ‘Turn ON‘ next to ‘Shields are turned off‘, and it should turn green with the message ‘You’re protected‘.

2. Turn Off/Disable Avast Temporarily (Specific Shield(s))
Besides turning off all shields at once, Avast also offers an option to temporarily turn off/pause any specific shield. Again, be sure you know what and why you’re doing it.
Step #1 – If so, then open the main Avast user interface, and go to settings (in the bottom left corner in the main Avast interface) » ‘Components’ (or ‘Active Protection‘ in the older version). There you will see all Avast shields (File System Shield, Behavior Shield, Mail Shield, Web Shield) listed.
Just find the one you want to disable and click on the switcher. Once you click on it, you will see four options – stop the shield for a) 10 minutes; b) 1 hour; c) until computer restart; d) permanently. Just select the period you want and click on it.

Step #2 – If the shield has been successfully disabled, you should see the switch change to ‘OFF‘ and the main window should be yellow with the message ‘You’re vulnerable‘. To re-enable it again, simply click on ‘Turn on‘ next to ‘Some shields are turned off‘, and it should turn green with the message ‘You’re protected‘.

3. Uninstall Avast Antivirus Completely
If none of these steps solved your problem, then you can consider uninstalling Avast Antivirus completely. Although we strongly discourage it, as Avast is the best free Antivirus available.
If you’re sure you want to do it, follow our step-by-step guide ‘How to Uninstall/Remove Avast Antivirus 2017‘ or download the simple removal tool called Avast Uninstall Utility.
Additional Notes
Although we have used Avast Free Antivirus 2017 screenshots in this article, these steps are also applicable for all Avast Antivirus solutions (i.e. also for Avast Pro Antivirus, Avast Internet Security, or Avast Premier) running the latest version available.
Steps are relevant for all Windows versions – Windows XP, Windows Vista, Windows 7, Windows 8, Windows 8.1 and Windows 10 (including Anniversary Update).
Turning off Avast protection may leave your computer at risk.
Antivirus software might be the reason why you cannot install the program successfully, such as drivers, video program and some other important applications. They might not recognize the software. So when you cannot install the software, you can try disabling the antivirus software temporarily. If you are using Avast Antivirus, you can follow these steps to disable it temporarily.
Step 1:
Click the small triangle on your Windows taskbar to open the notification area. Right-click the Avast Antivirus icon for a list of options related to the security suite.
Step 2:

Click Avast shields control. You can select the option depending on how long you wish to disable Avast Antivirus.
Step 3:

After selecting the option, you will be prompted to confirm the operation. Click Yes to make a confirmation.
Are You Know?
The Google email, calendar, and drive client that's almost perfect
Carnegie Mellon-led non profit received $250 million to create a new robotics institute
Japan space agency fails to launch mini rocket
How to Disable (Turn Off, Stop) Avast Antivirus 2017 Completely or Temporarily
Once in a while you’ll probably need to turn off your Avast Antivirus, or just pause some of its shields. Usually because you want to install some other party security software like firewall, or because Avast is blocking your favorite website or application.
OUR TIP : If you want to disable Avast because it’s blocking program or website you trust, we suggest to use the Avast Exceptions/White-list instead.
Here’s the quick step-by-step guide on how to turn off/disable Avast 2017 – completely or temporarily. Steps are applicable for all Avast antivirus products (Free Antivirus, Pro Antivirus, Internet Security, or Avast Premier).
Quick Summary
- Right-click on the Avast orange icon in the Windows system tray
- Select Avast shields control and select for how long you want to disable it
- Confirm by clicking Yes on the dialog
Read more detailed steps and other options including screenshots below
1. Turn Off/Disable Avast Completely (All Shields)
Turning off all Avast shields basically means completely turning off the whole Avast Antivirus active protection. So be sure you know what you’re doing, although it’s actually quite simple.
Step #1 – Just navigate to the Windows task bar and find the orange Avast icon. By default it is hidden in some Windows systems, so click on the top arrow if you don’t see it. Once you find the icon, perform a right-click on it, look for the option ‘Avast shields control‘, and select one of the options there – disable for a) 10 minutes; b) 1 hour; c) until computer restart; d) permanently.

Step #2 – Whatever option you will choose, Avast will ask you for a confirmation, which you have to confirm by selecting ‘Yes‘. And that’s it, Avast and all its shields should be disabled/paused for whatever time period you have selected.
Step #3 – If you want to make sure Avast is really disabled, just open its main window. It should be red and saying ‘You’re in danger‘. To re-enable it again, click on ‘Turn ON‘ next to ‘Shields are turned off‘, and it should turn green with the message ‘You’re protected‘.

2. Turn Off/Disable Avast Temporarily (Specific Shield(s))
Besides turning off all shields at once, Avast also offers an option to temporarily turn off/pause any specific shield. Again, be sure you know what and why you’re doing it.
Step #1 – If so, then open the main Avast user interface, and go to settings (in the bottom left corner in the main Avast interface) » ‘Components’ (or ‘Active Protection‘ in the older version). There you will see all Avast shields (File System Shield, Behavior Shield, Mail Shield, Web Shield) listed.
Just find the one you want to disable and click on the switcher. Once you click on it, you will see four options – stop the shield for a) 10 minutes; b) 1 hour; c) until computer restart; d) permanently. Just select the period you want and click on it.

Step #2 – If the shield has been successfully disabled, you should see the switch change to ‘OFF‘ and the main window should be yellow with the message ‘You’re vulnerable‘. To re-enable it again, simply click on ‘Turn on‘ next to ‘Some shields are turned off‘, and it should turn green with the message ‘You’re protected‘.

3. Uninstall Avast Antivirus Completely
If none of these steps solved your problem, then you can consider uninstalling Avast Antivirus completely. Although we strongly discourage it, as Avast is the best free Antivirus available.
If you’re sure you want to do it, follow our step-by-step guide ‘How to Uninstall/Remove Avast Antivirus 2017‘ or download the simple removal tool called Avast Uninstall Utility.
Additional Notes
Although we have used Avast Free Antivirus 2017 screenshots in this article, these steps are also applicable for all Avast Antivirus solutions (i.e. also for Avast Pro Antivirus, Avast Internet Security, or Avast Premier) running the latest version available.
Steps are relevant for all Windows versions – Windows XP, Windows Vista, Windows 7, Windows 8, Windows 8.1 and Windows 10 (including Anniversary Update).
Turning off Avast protection may leave your computer at risk.
0 Response to "How To Disable Avast ( Full Guides )"
Post a Comment